Saturday, March 30, 2013

Happy Easter

Easter has always held a special place in my heart...it's the time of year that Christ's death and resurrection are celebrated. Since I'm not spending this Easter with my parents, I got nostalgic and thought about some things we did as a family on Easter. What a fun time we had cooking the Easter Sunrise Breakfasts for our church (we had about 60 members). However, I don't miss getting up at 5:00 a.m.--or was it 4:00 a.m.?
 
So this year hubby and I are making a new memory. I'm hosting Easter Dinner for several friends. Hopefully it will be a happy memory and not a disaster...it's been awhile since I've cooked a sit-down dinner for 10 adults. I'm not sure if I'll have too little, too much, or just enough food. But I'm counting on the fun fellowship to outweigh any of my shortcomings as cook and hostess.
 
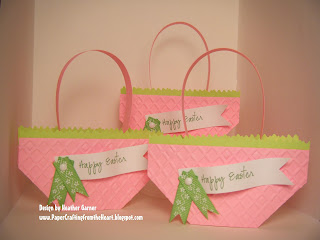
To set a festive table, I wanted a little "Easter-y" type favor. And since the gals at CAS-ual Fridays are still hosting their "Anything for Easter but a Card" challenge, I came up with these...
 
 
I used a Spellbinders Octagon die for the basket--I always wondered what I was going to do with these dies that came as part of a packaged set I bought.  After embossing the octagon, I cut it in half.  I glued one half to the front and the other half to the back of a little box I made (1.5"x1"). Then I cut some "grass" and glued it to the top of the basket. I added a paper handle, some ribbon and a Happy Easter computer-generated sentiment to complete the favor basket.
 
Super quick and easy.  I made pink for the ladies and blue for the men. They'll get filled with candy and placed by their plate.
 
So even though I can't be with my parents this year for Easter, being with friends is the next best thing. 

Friday, March 29, 2013

Easter Bags

I didn't want to do the traditional Easter Basket for my hubbie this year filled with candy goodies. After all, we both don't need the jelly beans or chocolate. He has a long list of items he'd like for his motorcycle and other sports, so I thought I'd get him something that would last...and wouldn't cause him to gain weight.

But, I needed a gift bag to put it in...and since I make cards and bags for others, I thought I'd make a bag for his Easter gift this year.

The gals over at CAS-ual Fridays are having an Easter Challenge with a twist...your project can't be a card. What a perfect time to work on the gift bag.
 
It was very simple and took me less than 30 minutes to put together (although if you know my hubbie, please tell him it took me ALL day-smile). I already had the flowers so I thought I'd use them. I embossed a paper Easter napkin to white cardstock to use as the background. Then I die cut a lime green mat. I placed a doily behind the flowers. A white lacy border with ribbon and a few butterflies finished the bag.
 
And because it's going to my better half...I get to keep the bag to use again. Now that's an Easter gift to myself!
 
Here's a close-up of the flowers. What do you think, my Craft Club gals? Would you like to make one of these bags also? Comment on this blog post and if there's enough interest, I'll hold a special class in April. Not in time to use the bag as an Easter bag this year, but it's a bag you can use anytime, for anything.
 
 
Materials Used:
  White Paper Gift Bag
  Striped Napkin from Dollar Tree
  Purple Ribbon from Dollar Tree
  White, Lime Green, Purple, Yellow, Blue and Pink Cardstock
  Stampin' Up! 5 Fancy Flower Punch
  Martha Stewart Butterfly Punch
  EK Success Lacey Border Punch
  Spellbinders Labels Two die & Rose Creations (leaves)
  Studio G Glitter Glue
  Lace Paper Doily


Wednesday, March 27, 2013

Remember when...

     So much has changed since I started paper crafting. In some ways, cardmaking has become much easier: computers, die-cuts, machines, etc. And so many choices on designer paper, cardstock colors, matching ribbons, buttons and other embellishments. Wow! No wonder my Craft Room is overflowing.

     The gals over at 365 Cards (they're the ones that encourage you to make a card a day) had a recent Challenge for us to create a card using the trends back when we first started cardmaking.

     Boy, did that take me back. Fortunately, I'm not sure I should admit this, I still have some of the paper and punches I used when I first began making cards. So I used them to create the following card.

 
     The DP is cardstock that I had splattered with bright green and pink paint. The corner punch is one of the first ones I ever bought. I also used a couple old Sizzix dies (the heart and tags). It was all put together on pink cardstock with a bright green mat. OK, the ribbon is new, but I'm sure I used ribbon back when I started making cards.
 
     I'm also adding this card to the Moxie Fab World Tuesday Trigger (the picture is below).  I'm picking up the pinks and greens in the picture. I really love the Spring colors.


Tuesday, March 26, 2013

Correcting an "Oops!"

I was creating a card the other day and accidentally had an "oops!" with my ink pad. Normally I would just start over, but this card was just about done and it was for a challenge over at The Play Date Cafe (check it out here). The colors for this challenge, amethyst, emerald and peridot, are absolutely beautiful. So rich and elegant.

After cutting the white cardstock for the sentiment, I inked it slightly to add some emerald color. After I stamped the sentiment, I dropped the stamp on the corner. It's hard to see the ink smudge (in the circle), but it's definitely there.

 
So I got creative, found some patterned paper with the above colors and created a small flower. Actually, I think it balances the card, so maybe this was meant to happen.
 
 
The card front is slightly smaller than the back, allowing the flower strip to show whether the card is open or closed.
 
 
When you have an "Oops!" -- get creative...add ribbon, a flower, a button, a bow, etc. You might be surprised how it enhances your card. Remember, there are no mistakes in cardmaking; it only means the card wasn't finished yet.
 
Items used:
  Cardstock: Emerald, Peridot, White, Metallic Amethyst
  Feathers
  Spellbinders Die-Cut Labels Nine
  Martha Stewart Flower Punch
  EK Border Punch
  Stampology Turquoise Ink Pad
  JoAnn Purple Dye Ink Pad
  Patterned Paper and Brad
 

Sunday, March 24, 2013

Quick and Easy Cards

Do you have a drawer or box full of “stuff” that you don’t use, but you also don’t want to get rid of any of it either? I actually have several…one of which is a drawer of stickers, rub-ons and other embellishments.

     Thank goodness CAS-ual Fridays has a challenge to create a Clean and Simple (CAS) project that doesn’t use stamps—I’m assuming I can’t use any of my “digital” stamps either. Check out the challenge here.

    So I went through the above mentioned drawer to see what I could come up with. And, since it's also a CAS challenge, this is what I put together. Very basic compared to other cards I do, but cute nonetheless.

 
I had a lot of fun putting this card together.  It’s amazing how easy a card can be when all the elements are basically done for you. And, there was nothing to clean up--I really liked that part. Hmmm…I may have to open that drawer a little more often.

Items used:
  Die-Cuts: Spellbinders Lacey Circles and Classic Scalloped Circles Small
  Sentiment: Cloud9 Design Clear Epoxy Stickers
  Pastel Dots: heidi grace designs Borders Rub-ons
  Flower: Greenbrier (yes, it’s from Dollar Tree)
  Cardstock: White, Lilac and Metallic Violet

Helpful Hint:

SRM Stickers is sponsoring the above challenge. If you like to make cards but don't want to buy a slew of ink pads and stamps, check them out by clicking on their name. They have many sayings, images, etc., that "melt" into the paper (not like the vinyl letters we used to use years ago).

Saturday, March 23, 2013

Flowers

Do you ever go through stages where you find yourself leaning toward one embellishment element? I try to vary what I make or put on a card, but lately I seem to be leaning toward flowers. It seems every new card or project has a flower on it...in some form (paper flower, stamped, embossed, patterned paper, etc.).
 
I'm having so much fun finding new ways to make them and use them that I may just have to hold a class on "Using Flowers on Your PaperCrafting Projects."
 
Fortunately, Catered Crop is holding a Challenge that must include a flower (paper, stamped, embellishment)! How lucky am I?! Check out their challenge here...you'll find some great ideas.
 
 
I really enjoyed making this card; it was for a very special friend. Stay in touch...I have a few more ideas to show you in the upcoming weeks. Here's a close-up of the flower.
 
 
Here's what I used: Spellbinders Rose Creations and Labels Nine Die-Cuts; organza ribbon, feathers, ivory card base, olive green cardstock, and burgundy patterned/stamped cardstock (I don't know where I got this...I just found it in my stash).
 

Thursday, March 21, 2013

Surprise! Surprise!

I’ve been making cards for about 12 years now and I have never had a problem mailing them. I’ve learned over the years what is regular mail and what requires special processing – meaning “extra postage.”

     So, imagine my surprise when I tried to mail two cards the other day. I didn’t have any stamps, so I had to go to the Post Office. Apparently the person waiting on me does not like handmade cards. I deduced this after she repeatedly said “why do people have to make their own cards.” I bit my tongue rather than reply.

     I was told the first card (flat except for 4 little 1/8” puffies I used to puff up the sentiment) required extra postage because there was a slight “bump” to the package—“it has to be absolutely flat” I was told as she laid it down and squished it with her hand so I would understand what ‘absolutely flat’ meant. Because it wasn’t, it would cost 66 cents. Fine...mail it.
 
     Then she said since the other card had more bumps in the envelope (the bow and more puffies), it would require hand-stamping which meant “Parcel Post”…at a cost of over $2. I didn't argue, since I didn't want her to throw away my cards after I left. She actually charged me less (92 cents) and hopefully both cards will get to their new home.

     With the above in mind, I will probably only make cards from now on using no ribbon, no brads, no puffies, no flowers, no die-cuts, no multi-layers…nah, who am I kidding? Those are the things I love about a card. I’ll just put LOTS of cardboard around the card so it appears flat!  And, at least 66 cents postage on my little puffie cards and 92 cents if they're more than 1/4" thick.
 
Here's a card for one of our male friends that I'm hoping can be mailed for 46 cents. No puffies and no bows. I think it's flat enough and hopefully not too plain. But then men don't require a lot of frills.
 
 
Instructions: designer paper on metallic burgundy cardstock; wrap ivory grosgrain ribbon around and place it on an ivory card base. Print the image on ivory cardstock, cut it to size and place it on metallic burgundy cardstock (don't use dimensional puffies if you want to mail it). Quick, easy and, hopefully, mailable.

Wednesday, March 20, 2013

A Little Birdie Told Me

Birdie Brown, one of my favorite digital stamp websites, has another 2nd Birthday Challenge. This is one of the best challenges because it's an Anything Goes challenge. That means you can create any type of card, for any occasion, as long as you use one of her digital stamps...she even offers free digital stamps to make playing along even easier (click here for the challenge info).

 
I used a free digital stamp from Birdie Brown on this card (click here for the digital stamp). The patterned paper works well with the digi-stamp design. Very "spring-like" and cheerful. I used Copics to color the birds and flowers, then used a clear glitter pen to add some sparkle to a couple flowers and the birds' tail feathers.
 
Digital stamps are great to work with because you can resize them to whatever dimension you need. You can even rotate or reverse the image. You can find digital images/stamps in a number of locations; some are free and others are available for a nominal charge. Over the next few weeks, I'll feature several websites that have digital stamps as well as some freebie images that I've used.


Sunday, March 17, 2013

Sketches

Card sketches make cardmaking so easy. It's like a room layout for your card. The hard part, the card design, is done for you...all you have to do is decide what colors/papers/embellishments/sayings you want to use.

     365 Cards is having a sketch challenge this week. You can check it out here. Even if you don't enter, check out the sketch; it's a great design that works for so many occasions.

     I knew right away the card I wanted to make using this sketch. I have some beautiful deep purple metallic cardstock and coordinating feathers. Since I wanted a "get well" card, I thought I'd add a rose to the front. So easy to make. 
 
 
     I inked the white sentiment cardstock using Brilliance Pearlescent Lavender because I couldn't find anything I liked to go with the deep purple metallic. The ink has a shimmer to it (I know it doesn't show up well in the photo). The sentiment is from Stampin' Up!-Thoughts & Prayers set.


     I inked the edges of the rose petals using the same ink and then applied some glitter to create "dew." I freehand cut the leaves, created "vein" creases, then inked over the top using Tim Holtz Crushed Olive Distress Ink.  I also put a white punched border behind the feather to create a lattice effect.
{Note: if you take my card classes, we'll be making these roses in an upcoming class.}

Friday, March 15, 2013

Multi-Function Cards

I love a card design that can be used for any occasion...birthday, thinking of you, get well, congratulations, etc. I need to make a box of them, since I never seem to have the right card for the right moment.
 
     Case in point...it's my daughter-in-law's birthday soon and in looking through my stash of birthday cards, nothing really seemed appropriate for her. Then I noticed that The Play Date Cafe had a 'Splash' challenge using the colors Black, White and Coral (check it out here ). I love these colors, so thought I would use this challenge to make her a special birthday card.
 
 
     I didn't have the black and white DSP that I 'saw in my mind.'  However, I found a freebie at Gina K. Designs (click here) that was exactly what I wanted. I printed the design onto white cardstock.
     I stamped the flower images using VersaMark Watermark Ink and heat embossed it after applying clear embossing powder. Then I fussy-cut out the 3 flowers.
     I matted the black & white pattern to black cardstock, then onto coral cardstock and wrapped it all with a peach organza ribbon and bow. I then placed the entire piece onto a white card.
     I die-cut a scalloped circle and puffed up the large and one small flower to add dimension. The saying is computer-generated and matted onto a black scalloped oval (with puffies for dimension also).
 
     Inside, I continued the design, using another embossed flower matted onto a black circle. I added some of the DSP, matted onto black also.
 
 
     Hopefully she likes the card and realizes that it was made with love and specifically for her...which is so much nicer than just pulling a card out of my "stash". And I think this is one design that could be used for multiple occasions.


Thursday, March 14, 2013

Spring is in the Air

We've had some beautiful weather lately...of course, living in Florida helps. So with warm weather and Easter right around the corner, I seem to be pulling out the bright colored cardstock more often.

    Ribbon Carousel is sponsoring a challenge this month: Spring is in the Air. You can check it out  here. Since I've been using my "Spring" colors lately, I thought I'd play along.

    Here's what I came up with. I didn't want to use just the ribbon by itself, so I ran a strip of lace on either side. I also created a bow using the lace with a brad to match the flower color. 
    I embossed the cutout behind the flower to give the illusion of stems and leaves. I also watermarked a flower image on the pink cardstock to continue the floral theme.

 
    The flower is a die-cut from Spellbinders. It almost matches one of the flower images in the ribbon (right above Thinking of You). I inked the edges of the petals with a deeper pink to add accent to them. Then I bent and rolled the petals to add some dimension.
 
 
     I love working with bright colors. It puts me in a happy mood for some reason. So, think Spring and make a few bright-colored cards yourself.

Wednesday, March 13, 2013

Christmas...really?

I realize it's only March, so why would I feature a Christmas card, you ask.
 
     Well, as I was checking out different blogs and challenges yesterday, I came upon a group that only does Christmas Cards, one every week--so they're not scrambling to get all their Christmas Cards made at the last minute. Makes sense. You can check them out here.
     Then I saw another blog that has a different challenge every day, to encourage you to make 365 cards each year. I guess I got the two mixed up and created a Christmas card with the latter's challenge criteria.
     Here's the challenge for this card (March 11 challenge). This challenge was to use a textured background over the entire card base. Even if you don't play along, it sure gets the creative juices flowing.


     I ran olive green metallic cardstock through the embosser, then lightly sanded the surface to give it a distressed look. The ornament is a sizzix die that I cut out of cardstock and gold vellum and put the two together (I didn't want a shiny ornament on a distressed card).  Placed the front on burgundy cardstock.
     I'm glad I mixed the two challenges together. I now have a Christmas card...one down, only 49 more to go.

Monday, March 11, 2013

Heart of My Heart

It seems like just yesterday that I married the love of my life--even though it was actually 23 years ago (March 10). To celebrate our special day, he took me out to breakfast and dinner! So I thought he should get a special handmade card from me.
 
 
I used a digi stamp from Birdie Brown (so cute and versatile) and colored it using Copics. And of course I had to add a Hugs and Kisses sentiment to the inside...after all, it's our Anniversary!

Sunday, March 10, 2013

Chevron Design

    Yesterday I was challenged to create a card using a Chevron pattern (paper, tape, etc). The challenge is here at Moxie Fab World-Chevron Challenge.
    Well, I suppose I could have ignored the challenge, but I hadn't made a card with this pattern before and I needed a Get Well card for a guy. Lately, it seems all our male friends are getting sick or having surgery.
  
 
     After creating the card, I felt it needed a little something extra--rather than using the traditional straight-ribbon-across-the-page style. So I got creative with the ribbon and mimicked the Chevron pattern.


    There you have it...a quick, simple card that could actually be used for either gender. I think I'm beginning to like the Chevron pattern.

Supplies: Rust, cream, brown and green cardstock; Chevron paper (edges inked); rust grosgrain ribbon; and sentiment.

Saturday, March 9, 2013

Using Scraps

I can't throw anything away. I know I should, but when it comes to papercrafting I have a hard time tossing the leftover cardstock.
I'm so glad I've kept my extra pieces, because this week's challenge over at CAS-ual Fridays is to use "blocks of color" in your project. Since I have plenty to select from, I decided to use colors suitable for a 'male' card. For some reason, men just don't seem to like a purple or pink card filled with flowers.
  **If you're not familiar with the term CAS, it stands for 'Clean and Simple.'


I used cream cardstock for the base and dark teal blue for the mat. I selected various "manly" colors which I glued down to a cream cardstock mat. I embossed this final piece to give it some texture.
 
The birthday cake is from Bugaboo Stamps. After coloring the image, I used a clear glitter pen to highlight the frosting and candle flame; then fussy-cut the image and used puffies to pop it up.
**I placed the Happy Birthday sentiment inside.
 
There you have it: Quick and Simple...I mean, Clean and Simple. Feel free to hop on over to CAS-ual Fridays blog and submit your own project.
 
 
Helpful Hint:
If you don't have a way to store all your cardstock scraps, this is what works for me. I sort them by color group, with the scraps behind the 8.5x11 sheets. When I need a smaller piece, I look in the scrap folder first before cutting a full-size sheet. I originally used a portable file box, but when I outgrew that, I moved everything to a file drawer.
**I think I need a bigger file drawer since most of the full size sheets are stored in another place.**


Friday, March 8, 2013

Easter Cards

This year I decided to have 4 other couples over on Easter. I'm looking forward to a wonderful time with friends and, hopefully, a delicious meal (it's been awhile since I've cooked for 10 people).

I recently saw a beautiful Easter card by Jessie Rones at
http://canyousayaddictedtostamps.blogspot.com/2013/02/cas-card-set-easter.html
and it inspired me to do Easter Invitations. This was such a simple, easy, clean design. However, if you're reading this and you received one of these invitations, it took me HOURS to do each one LOL

The design is similar to yesterday's card, using the negative die-cut image.


I stamped the egg image using VersaMark ink, sprinkled clear embossing powder and then heat embossed the image. I fussy-cut the image and used puffies to pop it up. 


I stamped the "You're Invited" saying, then rolled the strip to make it appear as if it was blowing in the wind.

I don't have a "grass" die-cut, so I had to improvise using grass-like scissors that I bought years ago. The colored cardstock is glued to the card base and the white top layer is raised using puffies.

I hope you enjoy this card (original design by Jessie Rone). Now, get out there and finish your Easter Cards!!

Thursday, March 7, 2013

Using Negative Punch/Die-Cut Images

When planning a card class, my main objective is to get the most use out of each piece of cardstock. This helps to keep the cost down. So when I need circles, for instance, I'll cram as many as possible onto an 8.5 x 11 piece of cardstock.
However, when making just one or two cards, the opposite often offers a more efficient use of cardstock.
  • Cut cardstock into 1/4 sheets. You can trim the edges later when you know what size you actually need. This works for color and white cardstock.
  • Center your punch or die-cut (either in the middle, the top, anywhere...be creative) and cut.
That's it. How simple. Now I not only have the cut out image (e.g. the scalloped circle), but I also have a negative image that I can use on the front of another card. Two for the price of one.

Below is an example of this. I cutout a space for the saying also. Then I embossed the top layer and placed a 2nd negative image behind (blue scallop circle and yellow regular circle). The stamped flower and saying went in the openings, flat to the card base. Then using puffies (my word for dimensionals), I raised the entire front of the card (the blue/yellow piece). A ribbon bow finished off the card.

 
Now, I'm off to work on a second card using the cutouts from this card. It's almost like getting 2 cards for the price of 1. And anyone that knows me well, knows that I love a bargain!!

Wednesday, March 6, 2013

Newbie

I was so excited yesterday when I figured out how to create a blog and post my first card at Birdie Brown's card challenge that I forgot to say "Hello" to everyone that may happen upon my blog.
 
I love crafting, especially papercrafting. And, I love teaching craft projects to others even more. So, hopefully you will find some inspiration in what I share.
Please leave a comment...it is SO encouraging to get feedback.
 
I teach classes throughout the year and this is one of the projects I taught at a recent class. I'm not sure who enjoys the classes more, me or those taking the classes.
**I wish I could remember where I saw this cute little gift box design so I could give credit where credit is due.**
 
 
Materials used: Spellbinders, punches, embossing folders, lace, ribbon, pearls and resin flower.


Tuesday, March 5, 2013

Birdie Brown Birthday Challenge

I love the digi stamps from Birdie Brown. She is celebrating her 2nd Anniversary/Birthday. Congratulations. There's a Birthday Challenge. Below is a card I made using one of her digi stamps.
Check out her blog at http://birdiebrown.blogspot.com/