Monday, August 31, 2015

Final Doodle Pantry DT Post

It's a sad day for me. This is my final post as a Doodle Pantry Design Team Member.  Things are just a bit crazy right now for me and Laurie gave all of us the option of staying on for another term or "retiring."  Since I wasn't sure I'd be able to fulfill my responsibilities as I'd like, I decided to step down.

But, since you know how much I love Doodle Pantry digital images, this won't be my last project using Doodle Pantry papers or images.


I used flowers from the Joyful Day set.  Printed on vellum, it allows the image and votive light to shine through the lantern.


The shimmery pink cardstock is 12" x 6" ~ I went with 6" tall so it would fit through my die cutting machine.  Each side is scored at 2-7/8" so I had a "tab" at the end.


Score tape all around the openings makes for easy placement of the vellum pieces.


I didn't want the votive to be seen through the "legs" so I created a "ledge" and everything lined up on my first try.  That does not happen very often ... believe me !


I glued (taped) 3 sides before sealing the side of the lantern and the final side of the ledge


Using Doodle Pantry pre-colored images allowed me to finish this project in under 2 hours from start to finish. 


I thought about embellishing the sides and decided to keep the lantern plain and simple. This way the beauty of the digital image shines through ~ pun intended {smile}


Products Used:
Joyful Day

Stampin' Up! Decorative Label Punch
EK Success Scalloped Diamond Slim Border Punch
Die-namics Designer Labels 4
Shimmer Pink Cardstock 12x12
Vellum 8-1/2x11
Scrappy Tape 1/8" wide & 1/4" wide
Battery Powered Tea Light

Sunday, August 23, 2015

Christmas Card Challenges #38

I'd like to welcome Pamela Harris and Teri Mosby to my blog. They are recent Bloglovin' subscribers.

The weeks are ticking by and before you know it, your Christmas cards will have to be mailed.  Do you have all of yours done yet?  If not, grab your cardmaking supplies and join the Christmas Card Challenges crew to get at least one more card completed.  After all, this week theme is:

Anything Goes

Due to personal reasons I wasn't able to make a card this week so a friend, Patti Widerman, stepped in for me to create my DT sample card.  I'm blessed to have so many talented friends that will help me out in a pinch ~ and since none of them have their own blog, I'm able to showcase their beautiful work here.


 The card decoration is made from 6 double sided hexagon pieces (Stampin' Up! punch).  How cute is this!


The front is embossed with a snowflake EF and the snowflakes were accented with white gel pen, mini flowers and pearls.


Are you wondering about the "trees" in the background?  These are handmade from cardstock cones that are wrapped with yarn. Since I didn't have any thick yarn, I took 3-4 strands of regular yarn, twisted the strands together and glued it to the cardstock cone.  So fun to make.  If you make your own cones, you can make them any size and they cost next to nothing to make. 
Note: Since the yarn is placed tight to the previous row, you don't see the cardstock pattern/color from the front ... only if you look inside the cone.  So, it's a great way to use up your strange cardstock patterns or colors that you know you'll never use.

Stop by Christmas Card Challenges to see what the other Design Team members created. Then, grab your cardmaking supplies and join along. I love to see what you create.

Saturday, August 22, 2015

Guest Designer~Send A Smile 4 Kids

Several weeks ago my card was picked as a Top 3 for a Send A Smile 4 Kids Challenge (check it out here). 

With that recognition, I was asked if I wanted to be a future Guest Designer ~ well, HELLO!! Who wouldn't want to be?!  This is a wonderful organization full of wonderful people who dedicate their time and talents to collecting (and making) donated handmade cards to be distributed to children while they're inpatient at Children's Hospitals across the U.S. and Canada.

The Challenge for the next two weeks is:
Anything Goes 4 Kids 
  
The sponsors are Flat Friends Boutique (prize 6 digis), Crafty Sentiments (prize 3 digis) and Stitchy Bear Digital Outlet (prize $6 gift certificate).


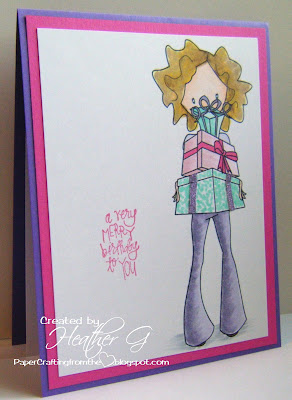
I used a digital image from Flat Friends Boutique ~ All Wrapped Up.


And, of course, I had to "bling" it up a bit by adding strips of lilac glitter paper to the bottom gift.


Children cards accepted are: Thank You Notes (the children give these to the nurses or doctors); birthday cards; Mother's or Father's Day cards; holiday cards and "Happy Any Day" cards.  Check out the Guidelines for donating cards here; or to read more about Send A Smile 4 Kids and what hospitals they support, check it out here.


SCP Craft Club Members:
I started a box that will be sent around the mid to end of September. If anyone from the SCP Craft Club would like to donate a Handmade Card to this extremely worthy cause, please let me know.  

On second thought, bring your card/s to the September meeting (9/10) and you'll receive a free package of Paper Crafting goodies ~ from me to you ~ for supporting this worthy cause. 

Since our cards will go to children in Florida Hospitals, wouldn't it be nice to send a box of at least 100 cards?  Please help me reach this goal.

Friday, August 21, 2015

Bingo Tic-Tac-Toe

I have a project to share with you today that's been in the works for several weeks now.  Not that it's taken me that long to finish it, but life just got in the way and I had to set it aside for a couple weeks.

Most of my cards / paper projects tend to lean toward the "girly" side. So I thought I would change it up and make something for a "boy."  Really now, what boy doesn't love cars, right?  This project was a blast to make.  I didn't take pictures along the way, but I'll try my best to explain how I created this project.

Since Doodle Pantry has LOTS of car images~ I mean LOTS of car images... I couldn't pick just one ... I decided to create a project that used just about ALL of them. Hence, I came up with,

Bingo Tic-Tac-Toe
The object of the game is to cover 3 cars in a row (just like "Tic-Tac-Toe").  However, since each card has a few different cars on them and the same cars are in different locations, it makes it more like "Bingo" but with no "Free Space."


 To make my life easier, I used all pre-colored digis.  I love that you get B&W line art AND color images with each Doodle Pantry set.  It saves a lot of time on a project this big.

Each Card has 9 car images ~ there were 13 to chose from (I only used 1 "Bug" car image) ~ so I mixed up the images on all 4 cards.  Yes, you only see one Card here, the other 3 are just about completed, but I wanted to get this post done.


I used Photo Editing software to create the grid on the digital paper from the Classic Bug & Gas Can set. The grid piece is 4-3/4" square.  The cars were punched with a 1-1/2" square punch. I rounded the corners and sponged the edges to set it off from the background paper. This piece is matted onto Navy cardstock. I'm debating about laminating the Cards, but haven't decided yet.


The "Call" tags (I'm not sure what to call them) have a car image on one side and "What a gas!" sentiment, surrounded by a dotted circle, on the other.  I used a 1-1/2" circle punch for the car image, then sponged the edges. Using my light table, I glued the punched car to the back of the sentiments I had printed on an 8-1/2" x 11" piece of white cardstock.  Then the entire sheet was laminated.  I used a 1-3/4" circle punch to punch out the "Call" tags. Note: Because the car image is a smaller circle, the lamination won't separate.


To play the game, the car image is placed face down and the tags are selected one at a time.  If it matches a car on your card, you cover that image with a:
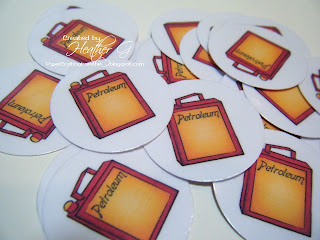
Marker Tag ~ aka Petroleum Can


I printed a sheet of gas cans, laminated the sheet and used a 1-3/8" circle to punch these out.

I hope you've enjoyed seeing this project as much as I enjoyed creating it.


The Doodle Pantry sets I used:
Classic Cars 1

Classic Cars 2

Classic Cars 3

Classic Clunkers 1

Classic Clunkers 2

Classic Bug & Gas Can

Christmas Card Challenges # 37

Things have been a bit hectic for me the past two weeks; so, this card is a bit late on my blog.  But there's still plenty of time to join in this week's Christmas Card Challenges #37 ~ White on White challenge.


The "Joy" die cut (Stampin' Up!) is actually shimmer white cardstock, although I think it looks a bit grey/silver in the photo.


Monday, August 10, 2015

Children's Cards

I was inspired today by three Challenges.  

First inspiration came from Send a Smile 4 Kids and their CAS challenge (all cards must be for children).  I created 4 cards so I can add them to my box of cards  for this group that does so much to brighten a child's day.

 The other inspiration came from two "Anything Goes" Challenges:


I even remembered to take pictures along the way to show you my process in creating these cards.  So, sit back and enjoy.

Since one is a CAS challenge, I thought I'd keep it simple by embossing the cardstock image using this plastic shim:

But, the oval in the shim didn't match the Spellbinder's oval dies I had.  I know I could have made my own "shim," but at the time, that seemed like work.  So I improvised.  I printed the pre-colored image (Doodle pantry Poodles of Fun) 4 up on a page.  Then I cut an oval out of the 4" x 5-1/4" cardstock using the oval die. 


Next, I embossed just the outer piece.

I glued the embossed piece to a white card. Then glued the oval image back where it belonged.

Next, I used the next smaller and next larger ovals (I have both oval sets) to create the "frame."

Using the 3 different sizes of oval dies places the "frame" right over the center cut line...so you don't have to worry about seeing an embossed or cut edge. 

The sentiment is a personal creation and I've included it for download at the end of this post.   

These images are just too doggone cute. What child wouldn't love to have a Poodle card? 


Click on the image below, then right click to save the white background, png file.


Products used:
Poodles of fun
~Petite Ovals Large and Small Spellbinders Dies
~Stampin' Up! Large Oval and Scalloped Oval Punches
~Embossing Folders~Wired Fence and Dots
~Memento Lilac Posies Ink
~Stampin' Up! Calypso Coral Ink

Wednesday, August 5, 2015

Crafty Creations #295 ~ Chalkboard

I'm the hostess this week at Crafty Creations Challenges.  By the time I had written that challenge post I completely forgot to write my own. Duh!  So, I'm sorry this is a bit late today. 

The Challenge Theme for the next two weeks is: Chalkboard  I've been wanting to try this technique; although I think I did mine a bit unconventional.


We're sponsored by Oak Pond and I used one of their digital images called Wine.

I reversed the digital image and then changed the background to a dark grey~have I mentioned before how I love working with digital images? LOL  I created the sentiment also.  It's a png file with white lettering ~ I've included the black image below as a freebie.  In hindsight, I think I should have softened the "white" sentiment a bit; but it was my first try at "printer" chalkboard (vs. "stamping" chalkboard).

It may be hard to see in the photo, but I used a white watercolor pencil to shade the grapes (and darken a few of the lines) and green to color in the vines. A CAS card, but certainly not as quick as I had hoped.

I hope you hop on over to the Crafty Creations Challenges blog and check out what the other DT members created.  I hope you join along because I'd love to see what you create.


Feel free to save and use the sentiment below. I'd love you to link back to my blog if you use it.  It's a png file with clear background, so it can be layered over other digi's. I hope you enjoy!

Sunday, August 2, 2015

Christmas Card Challenges #35

This week is a Color Challenge at Christmas Card Challenges. We'd love it if you played along using the colors, however the only real requirement is to make a Christmas card.  You'll thank me in a few months for pushing you to make a card each week. 


Once again I dug into my many scrap boxes to find the pieces for this card. Everything was punched, embossed, cut or printed ... making this a quick card.  I did sponge some blue onto the decorative piece and sentiment just to add a bit more color.  The Scrapper's Delight Little Snow Angel was even printed and cut out; as was the sentiment from Doodle Pantry.

Check out what the other Design Team Members created this week by clicking on the image below.  I can't wait to see what you create this week.