Sunday, April 28, 2013

Using Die-Cuts to Emboss

Note: I have to preface today's post by saying that if you already knew the following information...please humor me and say "wow, how fascinating!" I'm sure there's a LOT of tricks and ideas out there in 'card making land' that I haven't even begun to learn. And, maybe someday I'll be lucky enough to discover something new.

I've been using die-cuts to cut out shapes for quite some time. And, I often emboss the shape with the die-cut once the piece is cut out. However, I thought the other day...I wonder if I can skip a step and just cut and emboss at the same time.

Yup, shortcuts are good...a step saved gives me more time to make another card ;)  So, I used my Cuttlebug machine and here's the order of the plates--from bottom up:
  • A Plate
  • B Plate
  • Spellbinders Die-Cut Medallion One (cut side facing up)
  • Cardstock (champagne metallic)
  • Embossing Rubber Mat
  • Piece of cardboard (from a cereal box)
  • B Plate
Imagine my surprise when I didn't get a cut image, but instead a beautifully embossed image of the die cut. This may not work well for all die-cuts, but it's worth a try. Below is the embossed, non-cut image on the left and the cut shape on the right.


And here is the completed card using the non-cut, embossed image.

 
I repeated the process using Spellbinders Fleur de Lis Rectangles on metallic Blueberry cardstock for the inside of the card.
 

Catered Crop is having a "Make an Impression" challenge (add embossing to your project). And, 365 Cards is also having a challenge "Emboss It" (create a clean and simple card that includes embossing). I'm entering the above card in both challenges.


Thursday, April 25, 2013

Handmade Flowers

I love new crafting ideas. So when I recently saw ric-rac flowers, I knew I had to make some of my own.

The group over at Creative Card Crew had a challenge to make a project using hand made flowers. And the team at Ribbon Carousel had a 'Showers and Flowers' challenge. What a perfect time to use the ric-rac flowers I wanted to make.

Wow...the flowers turned out to be the challenge.  I finally figured out how to make them, although I'm not sure it's the way they're 'supposed' to be made; but I love the way they look.  ;-)

I also love the way the card turned out. Thank goodness IT wasn't a challenge. Sometimes my cards just seem to 'happen' and this one did.

 
I wanted to carry the flower theme to the inside, so I stamped flowers using Stampology Pink Sapphire for the flower outline and Memento Dandelion for the inside color. I cut out one of the small flowers and used dimensionals to raise it off the page.


Here's a closeup of the ric-rac flowers. I used a Martha Stewart snowflake punch for the 'leaves.'  I think I'll make a few more ric-rac flowers...once my fingers recover. They tend to cramp up more than they did 20 years ago, and this was definitely a 'finger-cramping' task.


The colors I used were for another card challenge (hot pink, golden yellow and silver). Unfortunately, I got my days mixed up and it ended yesterday so I couldn't enter this card in that challenge. But I really like these colors together. Like I said...sometimes my cards 'happen.'


Wednesday, April 24, 2013

Paper Piercing and Freebie

What a fun time everyone had at Tuesday’s class (at least that’s what they all told me).  Paper Piercing adds a striking look to your cards.  It can be the focal point of the card or a decorative edge around an image or a cutout.

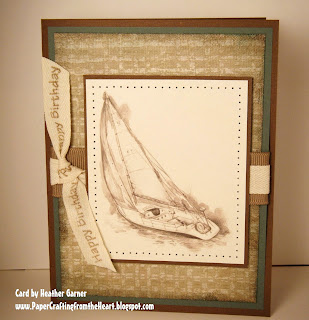
I never seem to have enough masculine birthday cards and since lace and flowers don’t shout “masculine” to me, this is a perfect card to do paper piercing on. Adding piercings around the graphic is a subtle way to enhance a card without “frilling” it up. I stamped “Happy Birthday” on twill tape and tied it off to the side. I’m entering this Birthday Card in CAS-ual Fridays Birthday Challenge.
 
Just about everyone indicated they wanted a Happy Anniversary card at last Thursday's class, so that was the other card. Just a CAS (clean and simple) design, yet slightly elegant with the piercing around the blue scalloped piece.


The image below was used on the blue and white card. Right mouse click on the image and you should be able to save the graphic to your computer.


Tuesday, April 23, 2013

Happy Birthday

I am thrilled when I get homemade cards. I recently had a birthday and received several and loved them all. They were very creative and I could tell a lot of time and thought went into each one.

 Yet, I tend to have a hard time making a card for someone who 'makes cards.' I want it to be just right for the person receiving the card. So even though I have a stash of cards ready to go, I had to make a special birthday card for a special friend. She's not a super frilly person, so cards that are clean and simple are best. She recently told me she loves feathers, so of course I had to include a couple feathers on her birthday card.
 
Happy Birthday, my friend. I hope you have many, many more!
 
 
I used the following to create this card:
  >Ivory cardstock for the card base and sentiment cutout
  >Bronze Eastern Metallic Linen cardstock for the mat
  >Gold organza ribbon
  >Champagne Eastern Metallic Linen cardstock for the Spellbinders Fantastic Flourish One
  >Spellbinders Labels Nine for the sentiment cutout and inked with Memento Teal Zeal
  >VersaMark Watermark Stamp Pad and Bronze embossing powder for the sentiment
  >Feathers
  >Gold rhinestones
 
I'm entering this card in CAS-ual Fridays Birthday Card Challenge. It appears someone else is having a birthday this month. Happy Birthday Michele.
 

Friday, April 12, 2013

Accenting Your Cards

  It's so easy to accent a card when you have all the right tools, especially embossing folders and die cuts. But you can also 'enhance' a card in other less expensive ways.
   One way is paper piercing. We'll be using this technique in my upcoming class, but you can easily practice at home. If you don't have a piercing template, any ruler will work...for the straight lines. Line up the ruler and pierce every 1/8 inch. To pierce a different shape, cut out the shape and do your best to punch evenly around the shape. It's really not that hard once you get the hang of it.
   In the card below, I pierced around the green stopping when I got near the sentiment. No embossing, no fancy die cuts, just a little bit of piercing to add accent to the card design.

 
Your piercing can also be the focal point of your card and I'll post more examples of paper piercing after the April 23 class.

Thursday, April 4, 2013

Manly Cards

I can't believe this week is almost over. Even though I haven't posted anything in several days, I have been working on cards for friends with April birthdays and my two upcoming classes.
 
However, I always seem to get distracted. For example, I should be finishing my mom's birthday card since her birthday is next week. Instead, I decided to work on a Father's Day card for my dad because the group at There She Goes Clear Stamps has a challenge to create a masculine card. And The Play Date Cafe is hosting a challenge to use Cappuccino, Slate and Burlap colors in your craft project...I think those sound like 'manly' colors to me. So, you can see how easy it was for me to get sidetracked. Check out the color palette below.
 
 
And, that's why I stopped working on my mom's birthday card and began creating this card for my dad (mom, please don't show it to him).  I added some 'cappuccino double cream' (my name for the lighter brown) cardstock also.
 
 
Believe it or not, I didn't have any steel-grey ribbon. I had lots of shiny silver, but that didn't shout 'manly' to me.  So I created my own ribbon edge out of the silvery-grey metallic paper. I carried the design elements to the inside of the card also.
 
 
Now I guess I'd better get busy and finish my mom's birthday card.